Step-by-Step instructions for producing Eyelets, Points and Brass Aglets
This page is part of the Fingerloop Braids Website.
By Master Bedwyr Danwyn (Ted Lazcano) and Mistress Rhiannon y Bwa
(Lois Swales)
Coordinating the Sizes
The starting hole in the cloth is often bigger than the finished
eyelet size because the sewing around the hole takes up space. The
hole should be just bigger than the aglet/point size. When
determining this, a number of eyelet test holes might have to be made.
Different thickness' of fabric will affect fit. Things to watch out
for: the finish on the wider end of the brass aglet is important. It
should be smooth or it will roughen and eventually break the sewing
around the eyelet hole. If the aglet is too big or rough it will wear
out the hole and may pull off the brass aglet. A sample set of sizes
that work together:
- Eyelet: Hole size before sewing: 3/16" (20 D nail size)
- Aglet: 1 1/2" long by 1/8" at the widest end of the cone.
This is made from brass sheeting .010 thick.
- Braid: 25 strands of embroidery floss simulates the look of the
extant reeled silk examples. Floss also is cheap and comes in many
colors. 25 single strands are used in total to make the diameter of the
braid. In other words, for a 5 braiding element pattern, each
element would contain 5 single strands of embroidery floss.
Embroidery floss comes as a thick stranded skein that has 6
individual threads per strand.) Another alternative is leather
strips of sheep (goat) or deer skin cut about 1/4 - 3/16"
wide.
Aglet/Chape/Point Making
|
First, you must make your mandrel. A mandrel is a
3/16" steel rod tapered by belt sanding in the last 4 1/2" to a narrow
cone, with the point slightly blunt.
Steel rods are available from hardware or metal shops (ask for
cold-rolled). To put on the taper, spin the steel rod against a belt
sander, and finish smoothing with finer sand paper. Testor's hobby
sanding films work very well for this.
Find sheet brass of .010 thickness. Thicker brass makes clumsy
aglets. 4" X 10" sheets are available for less than $2.00 at finer
hobby shops and art supply stores.
|

|
|
Making the flat aglet pattern from scratch:
If you want to make chape ends for other size braids, you may need to
make a new pattern.
To do so, take a 2" piece of masking tape and lay the longest edge up
the center line of the mandrel:
Roll the mandrel around the tape until the long starting edge meets
the masking tape. Then, when they meet, trim off the excess with a
razor blade. Unroll this tape carefully. Place this tape on your
sheet brass and trace around it with a fine point marking pen. Cut it
out with tin snips or aviation shears.
This will be used to make the final pattern. This piece will be
formed and trimmed until it is close to what you want. This may take
several rounds of bending and flattening out, followed by trimming
down and rebending.
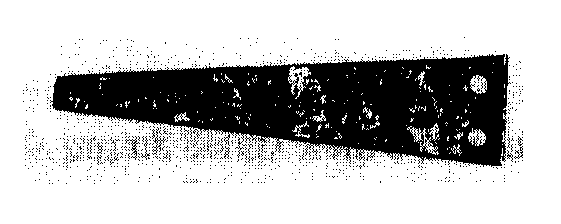
Once you have formed a cone that you like, mark the two holes for
sewing or riveting on opposite sides with a marking pen. Support the
inside of the aglet with a round toothpick and carefully drill the
holes (about 1/16") all the way through. Then unbend the brass and
flatten with a hammer. The sides should be perfectly straight. A
belt sander will help, or use a file along the edges.
This is your final pattern. Transfer this pattern to sheet steel and
cut out. Drill or punch the two holes. This template might also need
to be made a little smaller by sanding or filing. Getting the pattern
right is very helpful if you make a lot of aglets.
|
|
Aglet Making
First, make a flat brass blank. Lay the template on sheet brass
and scribe the pattern. Aviation snips work well for cutting out.
Flatten blank out by hammering. Align the blank on the steel
template and use a felt tip pen to highlight "overruns",
which can then be removed by sanding or filing. Exact size is
important for a neat aglet. Make sure that the edges are smooth.
To make the holes, put the steel template on top of the blank,
hold firmly, and center punch (spring-loaded center punches are
nice) through the holes to make prick holes in the blank. Use a drill
press or Tandy's jewelry punch (#2427 or 2432). Clean up hole
roughness (deburr).
Magic Pliers:
- There is one indispensable
tool -- buy cheap pliers. The jaws have corrugations which you will
grind smooth on a belt sander. Keep the pliers cool while you do
this or they will lose their temper.
Forming your cones:
- Take the blank and the magic
pliers. Press the unsupported brass against a wood block. Keep
moving along the center line until the blank is creased to a
shallow "V".
- Take the shallow "V" and place over the pointed mandrel end. Hold
the wide end on the mandrel and using the magic pliers, squeeze gently
upward along the sides of the "V" to gradually form a "U" shape. Work
up and down the blank. Now squeeze just the seam on one side (one jaw
is at the bottom of the "U", one jaw is at the top. The top of the
"U" will close and you will eventually have made a "C" - a more closed
"U". Slide this off the mandrel.
Forming the point:
- Put the "C" shaped
point back on the mandrel with the point extending out 1/4"
past the mandrel's narrow end. Hammer gently around until it
closes. As it closes, slide the mandrel back and work the next
section closed. You never hammer on the mandrel. It is just used
for support. Work your way up towards the wide end of the blank,
closing as you go. After you've done about 3/8", you can
hammer the rest around the mandrel or use magic pliers to close the
blank up so that the edges almost meet. Slide the point off the
mandrel and use magic pliers to close it completely.
Smoothing the seam:
- Slip back on the mandrel and
hammer over the seam itself. Slip off the mandrel and round the
hole by pressing on a nail with the pliers. To smooth the seam,
use a finger nail file (medium and fine). Be sure to even the seam
at the top of the aglet and along the side. Bevel the top of the
cone with a file.
Attaching the brass aglet to a braid or leather strip:
- Sewn ends:
- Glue the first 1/4" with
fabric glue. Massage it into the end and pinch into a point.
Twist this damp, glued end into the aglet as far as possible.
Crimp the top by using the magic pliers. This crimp should clasp
the braid or leather very tightly. Be careful not to damage the
braid while doing this.
- Clean up the crimped area
using nail files.
- Use sewing thread to attach
the point to braid through the holes. Go through both holes,
leaving an end of thread hanging free. Go up over the top of the
aglet and back through the holes several times. Finish by going
around the base of the braid where it enters the aglet several
times. Tie off the left over ends and run them up through the
center of the braid.
- Riveted ends:
- File a sharp point on the end
of a brass rod. This rod should be just less than the hole size in
the aglet sides.
- Heat the tip of the rod in a
flame until it glows orange. Cool slowly. This softens the brass.
- Follow the instructions for
sewn ends until you get to the sewing part.
- Then, take a really large
needle the size of the holes and run through the holes to open up
the fabric enough to pass the rod through.
- Pass the brass rod through
just so 1/32" hangs out the other side. Clip off the near end
so it, too, hangs over 1/32". Peen these ends over by hitting
gently with a hammer against a metal surface. They should flare
out over the brass of the aglet.
Eyelet Making
Awl Method
Punch a hole in the cloth with an awl. Some fabrics may close up when
the awl is removed. It helps to have a 12 D nail in the hole until
the fabric "relaxes".
Optional: Dab on fabric glue -- the kind that doesn't dissolve off in
the wash. Massage the glue in. The hole will shrink, then awl it
open once again. The glue will still be damp. Warning: this may
leave visible glue darkening around the hole that won't be covered by
the stitching. On the plus side , this strengthens the hole for hard
use. There is no proof this was done in period.
Take a 12 D nail and run it thru the glued hole. Follow this with a
20 D nail to enlarge the hole. Form and pinch the hole around the
nail. Allow this to dry 12--24 hours with the nail in the hole.
Then remove the nail.
Leather Punch Method
Use a leather punch to cut the desired hole size in the garment.
Optional: Glue the hole as above.
Grommets
A metal grommet is not necessary for a good eyelet, and is not always
found in existing period eyelets.
Metal rings were sometimes used around the hole under the sewing and
in some cases, attached at one edge of the ring (for bodice lacing)
and not sewn all the way around.
A type of medieval grommet is found on leather belts, but these are
not documented on cloth. Modern grommets on cloth are not period, but
can be disguised by oversewing them after application with buttonhole
stitch.
Eyelet Sewing
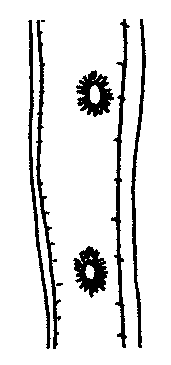
Once eyelets are prepared, either by awl or punch, whether glued or
unglued, buttonhole stitch is used to reinforce the hole. The Museum
of London examples show two concentric rings of blanket stitch, one
laid over the other. Alternately, an eyelet attachment for a sewing
machine can be used to replace handstitching. Backing the eyelets up
with lining fabric on the wrong side is a very good idea, as eyelets
take a lot of stress.
|
|
(Special thanks to Peter Adams, Mistress Clare de Crecy, and Master
Eldred Tremayne for their excellent Tournaments Illluminated article
titled "Pens and Points: Medieval Copper Alloy Cones" in the Winter
1993, XXVIII, Issue 109.)
Lacing your clothes on
There are two prominent lacing styles used from the 13th to 15th
centuries:
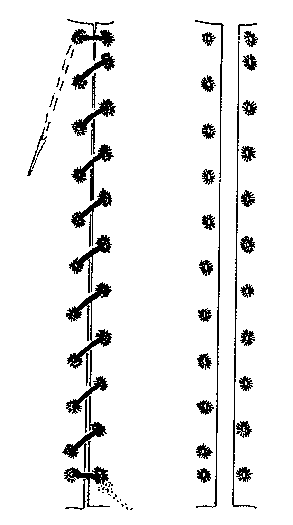
The Spiral
A single lacing cord starts at the bottom (or top) of two opposing
edges and spirals up (or down) through the eyelets to the end. The
cord has one end finished with a metal chape and one end knotted. At
the beginning, the chape end is threaded back through the cord inside
to hold it in place. It must be removable if knotted in place, of
course. A popular variation of the spiral skips eyelets and is left
spread open.
Eyelet placement is not identical for the right and left sides. One side
starts 1/2 a repeat offset. If the eyelets are the same on both
sides, the top and bottom edges would not be even.
|
|
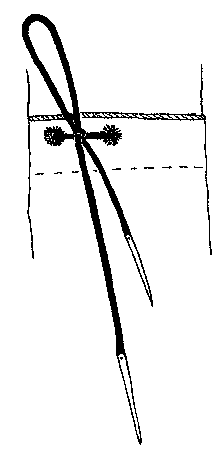
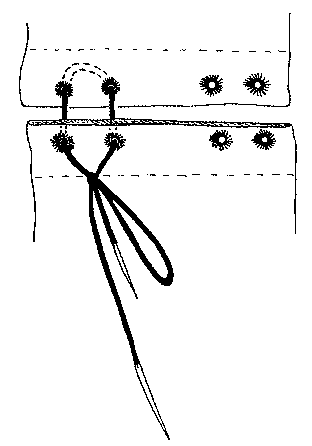
The Double Eyelet
The Double Eyelet system actually consists of a double set of eyelets
on the garment edges that are going to be joined by a point or aglet.
The point or aglet is a short braid with both ends finished with a
metal chape. This lacing style is very often used on men's doublet
fronts and -- most popularly -- for holding their hose to their doublet
bottoms. The point is threaded through the underneath garment so both
ends feed forward to the outer garment. It is tied off with a bowe
knot, where one loop is pulled all the way through. This makes an
easy release knot, for obvious reasons.
|
|
|
Less often used closures
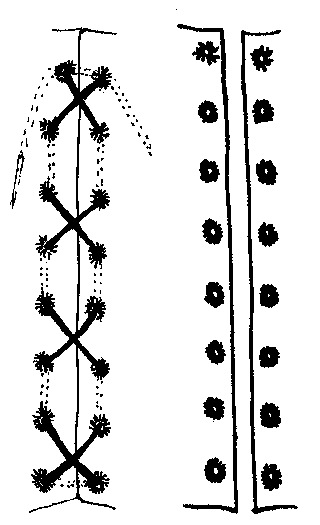
The Criss Cross
Curiously, the use of criss cross lacing is relatively late. It can
be seen in Italian Renaissance paintings. The criss cross takes more
braid length than the spiral and is more time-consuming to lace, which
may account for its lack of popularity early in the period.
|
|
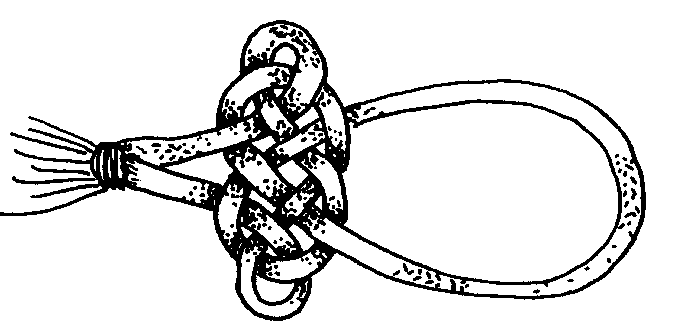
The Frog (not a period term)
|
Red and white "spotted" silk braid in V&A's T.313-1960 -
illustrated on page 221, Janet Arnold's Queen Elizabeth's Wardrobe
Unlock'd.
|
|
Contact with the East (possibly the Turkoman Empire and also with the
Poles, who adopted Turkoman costume) resulted in closures using the
"frog" and button style. One of these knot-like braid arrangements is
sewn into manuscript T above the
"every edge shall keep its color" pattern.
|

|
Also, there was a frog type closure used in England called "the Polish
style", see Queen Elizabeth's Wardrobe Unlock'd, pages 136--137.
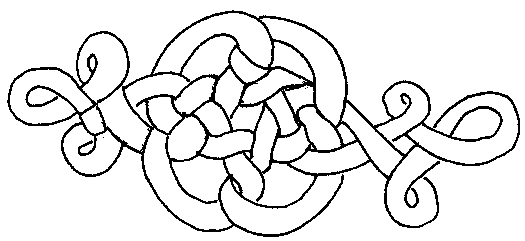
A decorative knot of gold braid is also shown in this book, page 278,
and in Ashelford, pg 66.
|
"A knot made from narrow gold braid, possibly a true love knot of
passmane lace of venice gold." Coarse multistrand brading, could be
fingerloop. - Museo de Valencia de don Juan, Madrid (Arnold, Queen
Elizabeth's Wardrobe Unlock'd.)
|
Return to the index.
Webbed by Greg Lindahl


